Installation
Upload the plugin folder to your plugins directory. Once installed and activated, you will have access to the features shown in the below screenshots.
Follow Our 3-Step Easy Install Process!
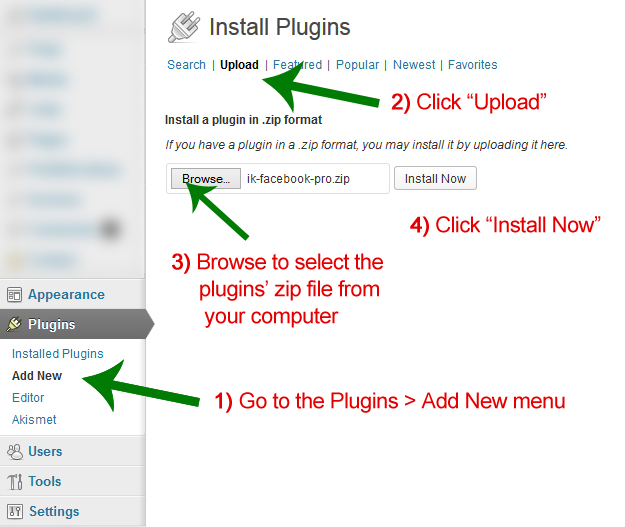
Step One: Go To The Plugins > Add New Menu, and Then Click Upload

Visit the Plugins > Add New menu, and then click the Upload link. Once there, you’ll see the screen from this image. Click the ‘Browse…’ button and navigate to the zip file you received when you purchased the Pro version, and then click Install Now.
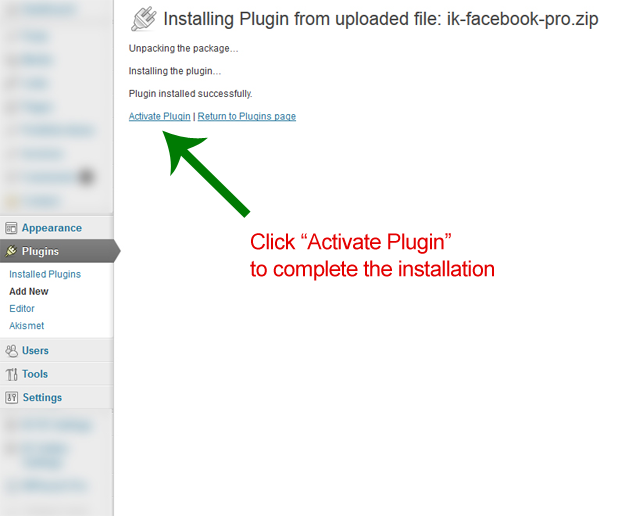
Step Two: Wait For WordPress To Install The Plugin, Then Click “Activate Plugin”

Once the file has been successfully uploaded, WordPress will automatically unzip it and install the plugin. When this process is complete, you will see a screen like the one in this image.
Step Three: Configure Your Settings
You’re all done! Now its time to configure your settings. Just click the “Social Settings” menu in your WordPress admin to start configuring WP Social Pro.
Next Steps: Add Your Facebook Feed To Your Website!
With the plugin installed and activated, you can now add a Facebook Feed to any page of your website using the Shortcode, or as a widget in your sidebar.
Here’s some quick links to get you started:
- How To Add Your Facebook Feed As A Sidebar Widget
- How To Add Your Facebook Feed To A Page Or Post
- How To Add Your Facebook Feed To Your WordPress Theme (using a function)
- How To Add A Facebook Like Button To Any Post Or Page
- How To Add A Facebook Like Button To Your WordPress Theme
Click Here to read the full instructions.
Having Trouble? We’d Love To Help
If you’re having trouble getting setup with WP Social Pro, just send us an email and we’ll be glad to help.
Gold Members: Free Installation Is Included
Gold Members, would you rather have us to install the plugin for you? We’d be happy to do just that. Just send send us an email with your details, and we’ll be happy to help.
Not a Gold Member yet? Click here to subscribe.
Get The Plugin Now
Do you need a copy of WP Social Pro? Click Here for pricing options.

